Chapter 1:
Introduction

Welcome to our first GUI (pronounced goo-ee) lesson. In the previous lesson, I promised we would start an entirely new topic this time—and that's what we're going to do! A GUI is what lets us interact with a computer using a mouse and pointer to click icons instead of just typing commands. The Mac OS, Windows, and X-Windows for Linux are all examples of GUIs. Creating GUI applications is (in my humble opinion) one of the more enjoyable aspects of using Java. It gets us away from the text-based format we've been using until now and into the realm of modern applications.

After all, how long has it been since you've used a text-based application? If you're like many computer users, you may never have used one! It's been years since I've used one by choice. Everything has gone GUI!

Today, we're going to start learning how to write GUI applications.

We'll begin with an overview of Java's GUI capabilities (a quick overview, I promise), and then we'll jump right in and write our first windowed application.

Chapter 2:
Java and GUIs

Java includes a lot of GUI power in its class library. All that power is in a group of classes called the Java Foundation Classes, or just JFC. JFC includes three smaller groups of classes: the Abstract Window Toolkit (or AWT), Swing, and Java 2D.

AWT was Sun's first group of GUI classes, and Sun included it in the first release of Java in 1995. AWT uses its host platform's graphic tools, meaning if you run an AWT application in Windows, it looks like a native Windows application, and if you run an AWT application in the Mac OS or Linux, it looks like a native Mac or Linux application. While some developers liked this, others wanted their applications to look the same on every platform.

Swing arrived with Java version 1.2, replacing AWT for the most part. Swing not only provides more GUI tools but also allows users to choose a native platform look-and-feel—which refers to the interface's general appearance and operation—or the cross-platform Java look-and-feel. The native look-and-feel adapts to its host operating system, while the Java look-and-feel stays the same no matter where it's running.

Java 2D is a group of classes for drawing two-dimensional graphics. It was originally introduced with AWT, but it has evolved since then to interact with OpenGL, giving it 3-D capabilities as well as the 2-D tools its name implies. Java 2D gives us tools for drawing shapes in a window. Swing actually uses Java 2D to draw many of its components, and we'll learn in another lesson how to use it do draw our own shapes directly onto the screen.

Today, we're going to start with Swing and learn how to build basic GUI windows and applications. Later in the course, we'll add Java 2D to our repertoire when we learn how to draw our own shapes in those windows.

"Hello, World!" Again!

If you took my Introduction to Java Programming course, you probably remember the "Hello, world!" Java program we created. We're going to start out with a simple "Hello, world!" program again. But this time, we'll make the message appear in its own window instead of in the console window. Here's what the window will look like:
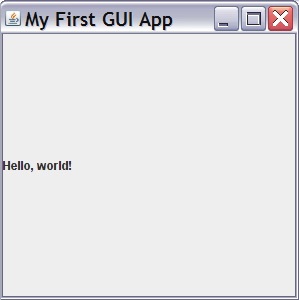


A GUI Application

First, I'm going to show you the program that created that window, and then we'll talk about how it works:

import java.awt.*;
import javax.swing.*;

public class GUIApp1 { private JFrame frame;

public static void main (String[] args) { GUIApp1 gui = new GUIApp1(); gui.start(); }

public void start() { frame = new JFrame("My First GUI App"); frame.setDefaultCloseOperation(JFrame.EXIT_ON_CLOSE); Container contentPane = frame.getContentPane();

JLabel label = new JLabel("Hello, world!"); contentPane.add(label);

frame.setSize(300, 300); frame.setVisible(true); } }

Now let's talk about how this program did what it did.

First, we imported two packages. The first one, java.awt.*, contains all the AWT classes. Swing replaced many of the AWT classes, but not all of them, and we'll still need some of them for our GUI programs. The second package we imported, javax.swing.*, contains all the Swing classes, which we'll use for most of our GUI tasks.

We only have one instance variable in our class, frame, a JFrame variable. Java uses the JFrame class to build windows, and we'll use the frame variable to create and manage our window.

Our main method is very simple. It creates a new GUIApp1 object named gui and calls its start() method.

The start() method is where all the work takes place. The first line creates our JFrame object. The JFrame constructor uses the string we give it ("My First GUI App") as the title for the window. Without that string, we'd get a window with an empty title bar.

The second line tells Java to stop running the program if the user closes the window. Without that, the program would keep running even after the window closes.

The third line creates a Container named contentPane. A container is a Java GUI component designed to hold other GUI components. We have to use one here because we can't add things directly to the frame. If this seems strange, let me explain.

TQA-13 --- Think of the frame as the wood frame around the glass of a window in a building. A Java frame holds the title bar with its icon and buttons, but we can't add items to it. We add them to the pane of the window, which will display all our GUI components. We call the frame's getContentPane() method to get the pane we will add our components to. The contentPane container is like the pane of glass in a window.

The following figure shows the parts of the window frame:


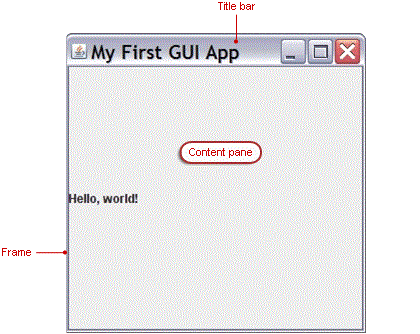
Parts of the window frame

If we continue along with our program, we see that the fourth line of the start() method creates another Swing object, a JLabel named label. You might see a pattern here. Swing class names start with "J" to separate them from the older AWT classes. Container, for example, comes from the AWT package, not the Swing package.

Anyway, a JLabel holds text to display in a window. The string we give its constructor is the string it will display.

After we create the JLabel, we add it to the pane in the fifth line of the method so Java can display it.

The sixth line sets the size of our window, 300 pixels wide and 300 pixels tall, in the call to frame's setSize() method.

The last line tells Java that it's finally time to display the window by calling frame's setVisible() method with an argument of true.

Okay, we've created a window. But it doesn't do much, does it? How do we make it do more? With more GUI components, of course! Java has lots of them: menus, buttons, radio buttons, check boxes, dialogs, sliders, scroll bars, and on and on.

We'll not only learn to display them, but we'll learn to interact with them, too.

Chapter 3:
Buttons and Interaction

Next, you're going to learn how to display an item that allows us to interact with it. We'll start by displaying a button, then we'll see how we can make it do something. Displaying a button is quite a bit like displaying our text. Here's the program, followed by the window it displays:


import java.awt.*; import javax.swing.*;

public class GUIButton1 { private JFrame frame;

public static void main (String[] args) { GUIButton1 guiButton = new GUIButton1(); guiButton.start(); }

public void start() { frame = new JFrame("A GUI Button"); frame.setDefaultCloseOperation(JFrame.EXIT_ON_CLOSE); Container contentPane = frame.getContentPane();

JButton button = new JButton("Click Me"); contentPane.add(button);

frame.setSize(200,200); frame.setVisible(true); } }

Here's the window:


A window with a button

As you can see, the text for the button can be set in its constructor, just like the label in the previous example. But there's something odd about this button: It takes up the whole window! It's a very big button. And it might not seem to do anything. If you run this program, you'll notice that it does do something—when you move your mouse over it, Java highlights the outline of the button. And if you click it, the color changes. But it doesn't do anything else.

So how do we make our button the size that we want? And how do we get it to do what we want? Those are two separate issues that we'll need to deal with individually.

First, let's talk about the size. The size of a button automatically expands to fill up the pane. Since we set the pane's size at 200 x 200, that's the size the button became. We can reverse the action and make the window the size of the button by replacing the call to setSize(200, 200) with a call to the frame's pack() method, like this:

frame.pack();

The pack() method changes the size of the window to fit whatever components are in it. When we replace the setSize (200,200) call with this, here's how our window looks:


A packed frame

If you're wondering how to get a small button in a large window, don't worry—we'll get to that later. We need a little more background first. So let's find out how to make our button do something. We'll make it simple. Let's say that if someone clicks our button, we want the color of the text to change to red and the message on the button to change to "I've been clicked!"

The code is the easy part. A little digging in the Java API will turn up the method calls we need to do that:

button.setForeground(Color.red);
button.setText("I've been clicked!");

But where do we put these calls? How can our program know when the button gets clicked?

TQA-14 --- Luckily, Java has a mechanism for dealing with GUI user actions. It's called event-handling. A Java event is a user action in the GUI that needs to communicate with the program. There are lots of different events in Java, and one of them is a button click. How do we get the button to tell us if it's been clicked? We have to listen for it.

I don't mean listen for an audible sound, though. Java has a way for us to tell a GUI component that we want to listen for events that happen to it. We do that by implementing an interface. (Remember those from the last lesson?)

Java has several types of listener interfaces. There's the KeyListener, the MouseListener, the TextListener, and more. The java.awt.event package lists all of them. The one we want is the ActionListener interface.

ActionListener has one method: actionPerformed(). If we use the ActionListener interface to tell the button that we want to listen for its actions, then it will let us know when an action happens by calling our actionPerformed() method. The actionPerformed() method is where we need to put the code we want to execute when the button is clicked. We do it like this:

import java.awt.*; import java.awt.event.*; import javax.swing.*;

public class GUIButton3 implements ActionListener { private JFrame frame; private JButton button;

public static void main (String[] args) { GUIButton3 guiButton = new GUIButton3(); guiButton.start(); }

public void start() { frame = new JFrame("A GUI Button"); frame.setDefaultCloseOperation(JFrame.EXIT_ON_CLOSE); Container contentPane = frame.getContentPane();

button = new JButton("Click Me"); button.addActionListener(this); contentPane.add(button);

frame.pack(); frame.setVisible(true); } public void actionPerformed(ActionEvent e) { button.setForeground(Color.red); button.setText("I've been clicked!"); } }

If you run this program, it will look like the last figure when it starts. As soon as you click the button, it will change to this:


A clicked button

To make this work, besides adding the actionPerformed() method and the calls it contains, we made four other changes to the program from last time. First, since the ActionListener interface is in the java.awt.event package, we needed to import that (see line 2).

Second, we added implements ActionListener to the class heading. That tells Java that we'll be implementing the actionPerformed() method for the button to call.

Third, since we needed to use the variable button in two methods, we moved its declaration out of the start() method and made it an instance variable. We now declare it in the second line of the class body, right after frame.

Last, we told Java to add us to the button's listeners. That's the call to addActionListener() in the fifth line of the start() method. The argument tells Java that our program will listen for actions connected to the button.

Phew! We've learned a lot already, but I have one more thing to share before we move on. Whenever an event starts a listener, it always passes an event argument to give us information about the event and its source, in case we want to use it. In this example we don't need it, but it's still there in our program because that's how the ActionListener interface defines the actionPerformed method. So we created an ActionEvent parameter, and we named it e.

Later, we'll see events where we'll want to use information from the argument, but we can ignore it this time.

Chapter 4:
Dialogs

To illustrate one more GUI capability today, we're going to use the button to open a dialog box. The dialog box will allow a user to enter text, and we will display that text on the button.

This application will start with the same button we used before:


Starting our dialog application

When users click that button, they'll see this dialog box:


The dialog box

Assuming a user enters the text "I clicked it!" (without the quotes), then clicks OK, the program will display the text on the button like this:


The updated button

Ready? Here is the program that did all that:

import java.awt.*;
import java.awt.event.*;
import javax.swing.*;

public class GUIDialog implements ActionListener { private JFrame frame; private JButton button;

public static void main (String[] args) { GUIDialog guiButton = new GUIDialog(); guiButton.start(); }

public void start() { frame = new JFrame("GUI Dialog"); frame.setDefaultCloseOperation(JFrame.EXIT_ON_CLOSE); Container contentPane = frame.getContentPane();

button = new JButton("Click Me"); button.addActionListener(this); contentPane.add(button);

frame.pack(); frame.setVisible(true); } public void actionPerformed(ActionEvent e) { String textToShow; textToShow = JOptionPane.showInputDialog( frame, "Enter the text you want to display:", "Input Dialog", JOptionPane.QUESTION_MESSAGE); if (textToShow != null) { button.setForeground(Color.red); button.setText(textToShow); } } }

Copy it and give it a try!

Now, let's break down the changes we made. Other than some minor name changes, nothing changed at all until we got to the actionPerformed() method.

TQA-15 --- The first thing we added to that method is a String object declaration named textToShow. We'll capture the user's input in that string so we can display it on the button.

The next statement does all the dialog work for us. It includes a call to the showInputDialog() method of the JOptionPane class. That method displays a dialog that has a text box for user input, then returns that text to us when the user clicks OK.

The JOptionPane class has several dialogs we can use, each called by its own method. The method showConfirmDialog() asks a user for confirmation, usually with Yes, No, and Cancel buttons. The showMessageDialog() method displays a message, usually with just an OK button so the user can acknowledge it. I will leave it to you to explore those in the API, and for now I'll describe the parameters for showInputDialog(). The parameters for the other dialog types are similar.

The first parameter is the method's parent component, the GUI component that identifies the dialog's parent frame. In our case, it's the frame that we used for our window.

The second parameter is the text message to display in the dialog. In our case, it's instructions to the user about what to put into the text box.

The third parameter is a text string to use as the title for the dialog. It shows up in the dialog's title bar.

The last parameter defines the type of dialog we want to display. This type defines the icon (if any) that will appear at the left side of the dialog box. The options and their icons are as follows:


5 types of Dialog boxes

Once our program calls the showInputDialog() method, it stops and waits for the user to enter text and click one of the buttons. If the user clicks the OK button, whatever text he or she entered is given back to us from the method call, and our assignment statement stores it in the variable textToShow.

If the user clicks the Cancel button, though, the dialog box does not give us back a string, and textToShow becomes a null string. If we try to put the contents of a null string into the button, we'll get an error. That's why we have the if statement right after the call to showInputDialog. The if statement makes sure we have a valid string before we update the button so we can avoid the error situation.

That's all there is to it. Java makes using dialog boxes very simple, as simple as a single call to a method. Experiment with what we've learned in this lesson. Try different sizes of buttons and windows. Try different dialog types to see the various icons you can use.

Let me know in the Discussion Area if you have any problems or questions about any of it.

Chapter 5:
Summary

We've come a long way in this lesson. We've learned quite a few things:

I hope I've whetted your appetite for more GUI programming because that's what we'll continue studying next time. There's still a lot to learn about setting up GUIs. Next time, we'll start by seeing how to put multiple items into our window. You'll notice that we didn't try that this time. If you're curious, try putting two labels, two buttons, or a button and a label into a window and see what happens. In the next lesson, we'll see why that happens and learn how to fix it!

I'll see you then.

Lesson 5 FAQs

Q: Does choosing a look-and-feel other than the Java look-and-feel mean a program can't run on multiple platforms?

A: No. Several of Java's look-and-feel options will run on multiple platforms. Its cross-platform (Java) look-and-feel will work anywhere, as will the Motif look-and-feel. Java's System look-and-feel will also work anywhere, but it will not look the same everywhere, since it adapts to the system it is running on. The Windows look-and-feel, though, will only work on Windows systems, and, likewise, the Mac look-and-feel only works on Macs.

Lesson 5 Assignment

Your assignment for this lesson is to write a GUI program that will use a button to count down from five to zero. When it reaches zero, it should display a label indicating the end of the count. Each click should decrease the number by one. For example, when the program starts the button will say "Five" or "5." After the first click, it will say "Four" or "4," and so on. When it gets to zero, the button should be replaced by a label with a message in it. The text in the label can say anything you like.

There are two things you will need to use that we did not discuss in the lesson. You will need to be able to find out what text was on the button when it was clicked. You can do that with the button's getText() method.

You will also need to know how to make a button disappear so you can see the label. A button has a setVisible() method just like a frame does. To make the button disappear, call its setVisible() method with an argument of false.

If you would like to see my solution, here it is:

Assignment 5 Countdown solution

If you would like a little more of a challenge, investigate JOptionPane's other dialog formats and see if you can make them work. The challenging part is determining which button was clicked if there is more than one button.

Let me know if you have any questions.

Lesson 5 Quiz Answers

1. What is a Java container?
A GUI component that holds other GUI components.

2. What is a listener?
A Java class that handles, or "listens for," user actions in a GUI.

3. Which of these packages supplies most of the Java GUI classes?
Swing.

4. Which of the following allows a user to supply text to a Java GUI program?
An input dialog box.

5. What happens when we provide users with a dialog box for text entry but they click the Cancel button?
The dialog returns a null String object.